Centralized Validation Rules
Centralized validation rules are custom data validation business attached directly to a table rather than being defined in a particular pipeline or data entry form.
When business rules are attached to a table rather than a pipeline or a form, they are always applied when the table is being updated regardless of how data enters the table.
In this way it is not necessary to repeat the same validation rules for the same fields in a pipeline or in a form.
Locating the Centralized Validation Rules
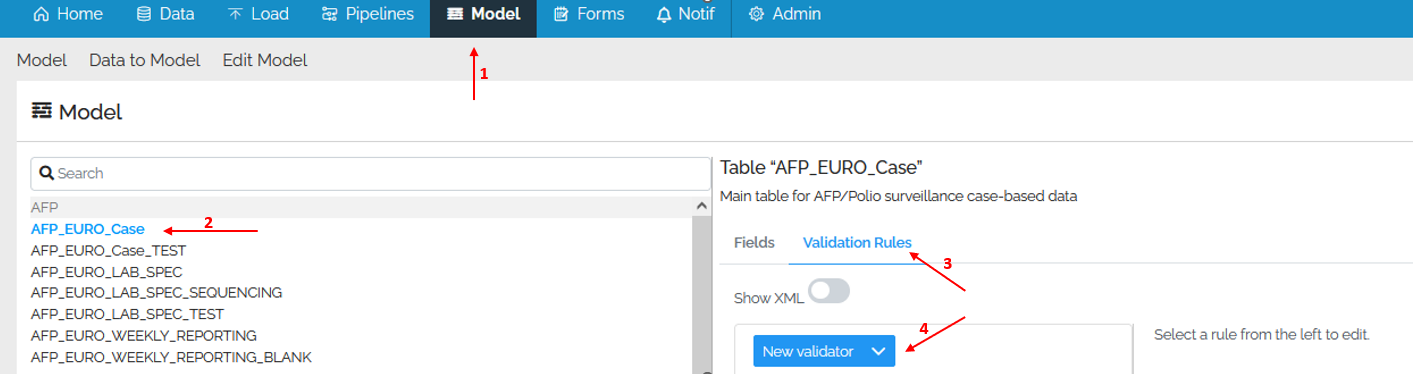
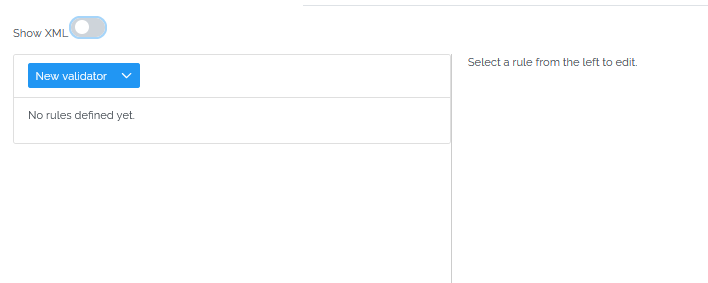
Validation rules are located on the Validation Rules tab of each tabe in the Model area:
- Navigate to your mart
- Open the model page
- Select a table
- Click on the validation rules option
- Choose the validation rule you wish to use
Common properties of validation rules
All validation commands share the following properties Column, Tag, Impact, Message if invalid and Context Columns.
| Property | Description |
|---|---|
| Column | It’s a required field, where you need to specify, using the drop down list, the column for which the rule will be implemented |
| Tag | Appears as a menu item in the issues summary to the data uploader, to group issues in a meaningful way. |
| Impact | The impact of failed validation. Possible values: |
| - Warning, raises a warning but no change made to data | |
| - Error_RemoveValue, value replaced by NULL. | |
| - Error_RemoveRow, record not uploaded. | |
| - Error_RemoveColumn, column removed. | |
| - Error_RemoveTable, entire table not uploaded | |
| Message if invalid | You may specify an informative message to give feedback to the users. Can contain {0} to be replaced by the invalid value. |
| Context Columns | If an error occurs, controls which columns are displayed to the user. |
Validation Rules
Let’s have an overview of each rule.
Details of each rule are also available in the script guide.
TestRow
This is the most versatile rule which allows testing of literal and field values on a row, including grouping of terms and control over AND and OR operators.
This rule has a user interface (UI) and also an xml editor. You can choose to use the UI or to edit the xml and switch back and forth between them. Additionally, TestRow supports a C# script. If you choose C# script, you can’t go back to the UI + xml.
TestRow UI
Since version 4.32, a user interface (UI) has been provided to make it easier to use. It is still possible to edit its xml definition, and even switch between the UI and xml.
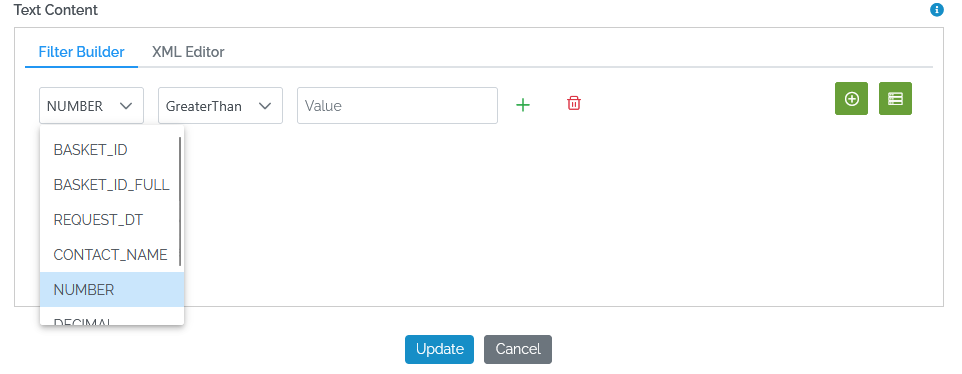
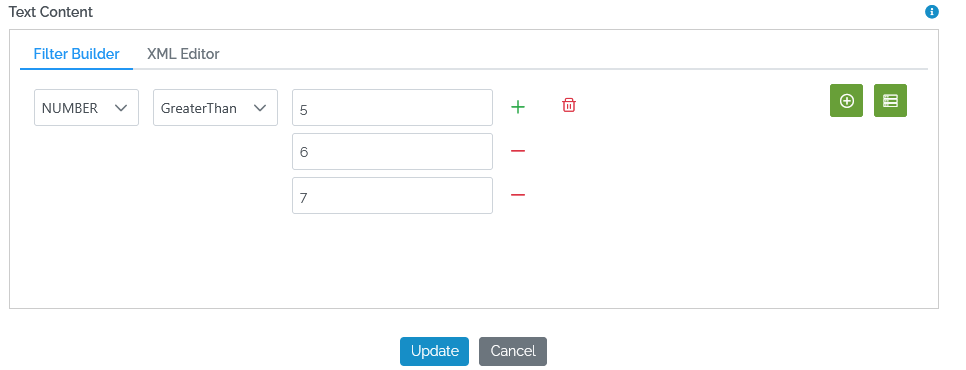
Using the interface a user may add multiple terms or a group of terms and the available operators are AND, OR.
For each term a user may add multiple values which are under the OR operator. In the example below, first the field “NUMBER” is selected and then by clicking the “+” we add the values 5,6,7.
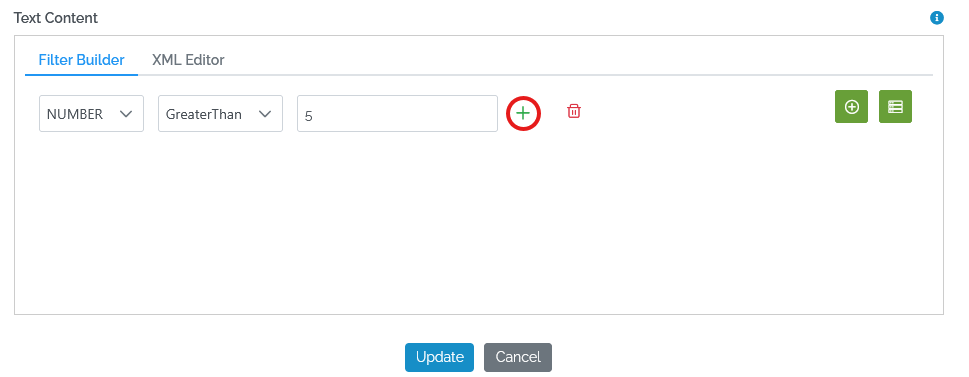
Now we may add the next term by clicking the “+” symbol as show below and select the AND operator using the drop down menu as seen below:
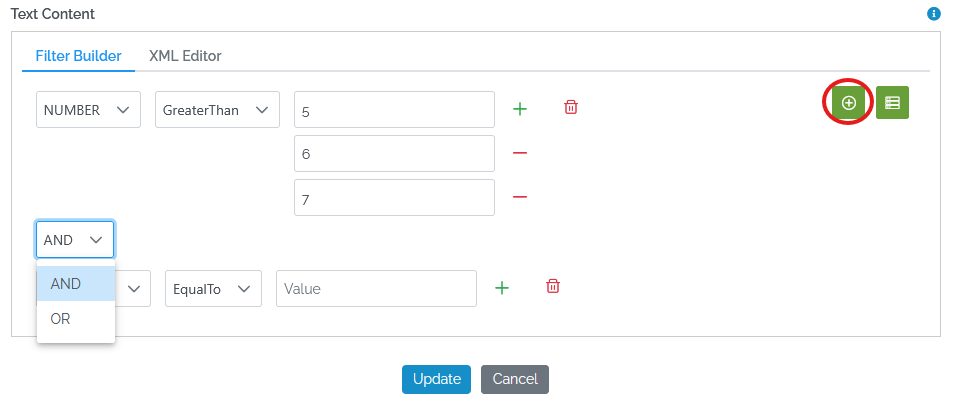
As the last step in this example we are going to add a group of terms which by clicking the symbol below
The available functions to compare fields and values are:
EqualTo, NotEqualTo, GreaterOrEqualTo, GreaterThan, LessOrEqualTo, LessOrEqualTo, LessThan, IsFalse, IsTrue, IsNotNull, IsNull, LikeContaines, LikeNotContains, LikeStartsWith, LikeEndsWith, LikeExactly
As a value you may also use system variables like:
${Yesterday.DateUtc}: the date ISO (YYYY-MM-dd) of the day before${Now.DateUtc}: the date ISO (YYYY-MM-dd) of the current UTC day${Now.TimeUtc}: the datetime ISO (YYYY-MM-ddThh:mm:ss) of the current UTC time${Now.DateServer}: the date ISO (YYYY-MM-dd) of the current Geneva day${Now.TimeServer}: the datetime ISO (YYYY-MM-ddThh:mm:ss) of the current Geneva time
TestRow Xml
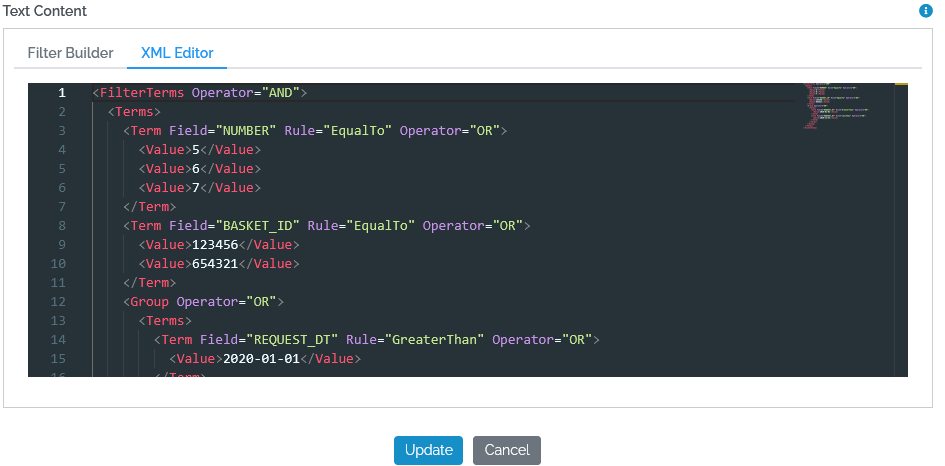
TestRow can also be created using the XML editor. Note that any change that takes place in the XML editor, is reflected in the filter builder. Below is the above example how it looks in the XML editor.
Note that, TestRow supports a C# script. If you choose C# script, you can’t go back to the UI + xml.
TestRow C# Expression
You may create a TestRow validation rule using a C# expression, as you may see in the examples below.
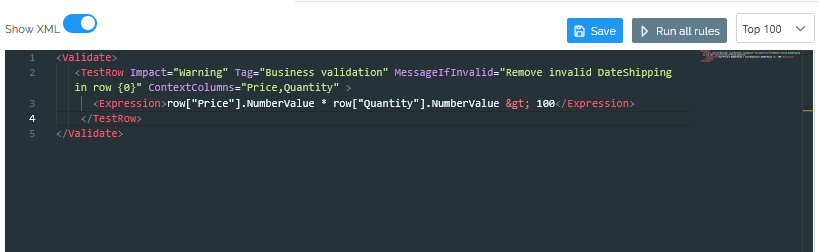
First click on the toggle “Show XML”
Then paste your expression like you see below and click “Save”
Below are two examples of C# of expressions. In the first example there is the use of CDATA which isn’t the case in the second. The difference is, that by not using the CDATA, you have to escape characters like the ‘<’ becomes %lt.
<TestRow Impact="Error_RemoveRow" MessageIfInvalid="Remove invalid DateShipping in row {0}" ContextColumns="Price,Quantity" >
<Expression>
<![CDATA[
return row["DateShipping"].DateValue != null
&& row["DateShipping"].DateValue < row["DateOrder"].DateValue;
]]>
</Expression>
</TestRow>
<TestRow Impact="Warning" Tag="Business validation" MessageIfInvalid="Remove invalid DateShipping in row {0}" ContextColumns="Price,Quantity" >
<Expression>row["Price"].NumberValue * row["Quantity"].NumberValue > 100</Expression>
</TestRow>
In both cases, once you create a TestRow this way, then you can’t use the UI builder.
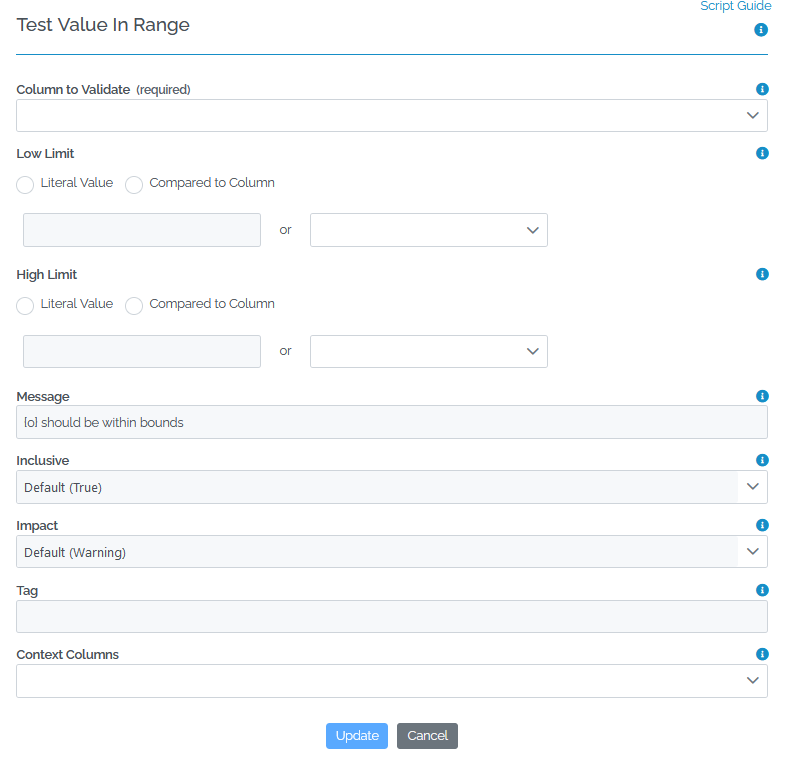
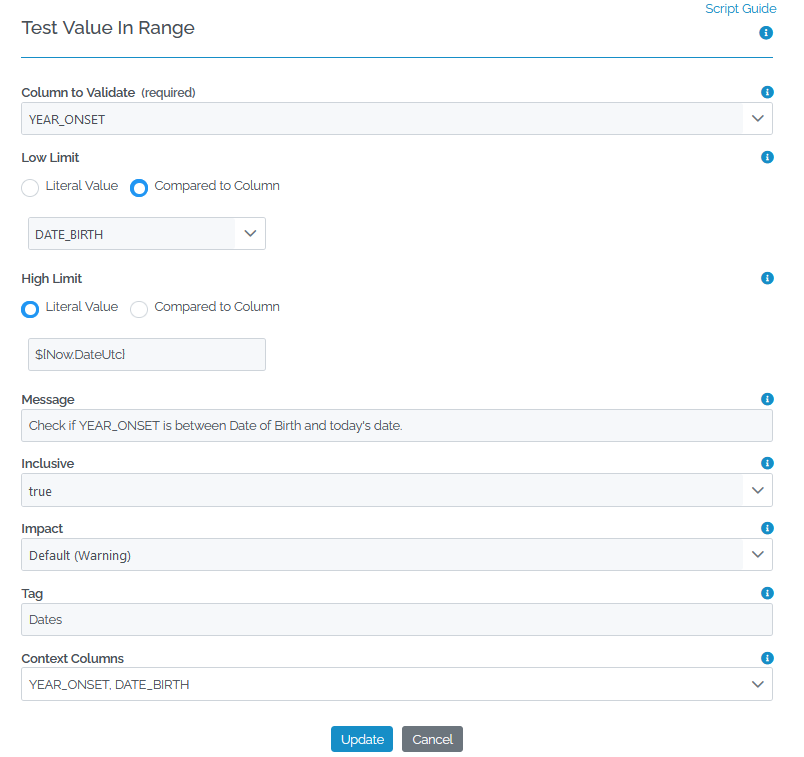
TestValueInRange
TestValueInRange checks that a value is above, below or within a certain range of limits as compared to literal or field values.
Low/High Limit: First you need to specify if either of the limits of the range will be a Literal Value or Compared to Column and afterwards you may specify the values for both low and high limits. You may also use ${Now.DateUtc} to set the literal value to today’s date.
Inclusive: Set the value to true if the limit should be considered in range or false if the limit should be considered out of range.
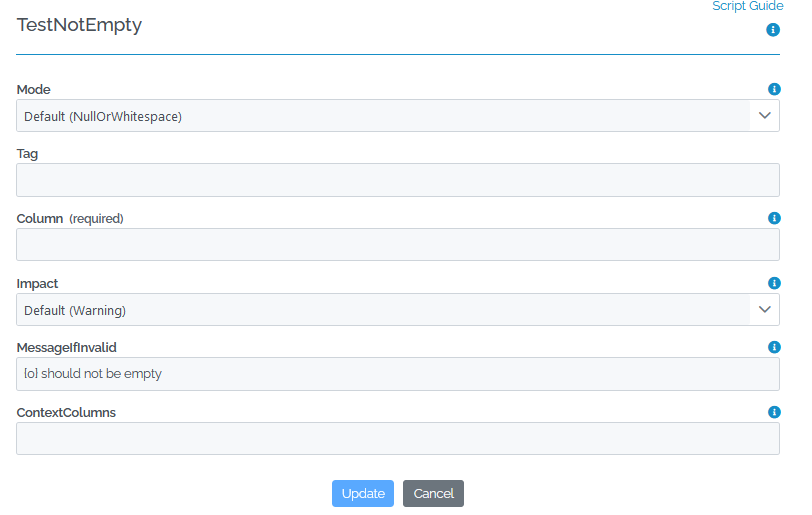
TestNotEmpty
TestNotEmpty Tests for the existence of required values but can be configured as to whether whitespace is considered empty or not.
Mode: There is a drop down list from where you may choose between Nulls, Null or Empty and Null or Whitespace which is the default option.
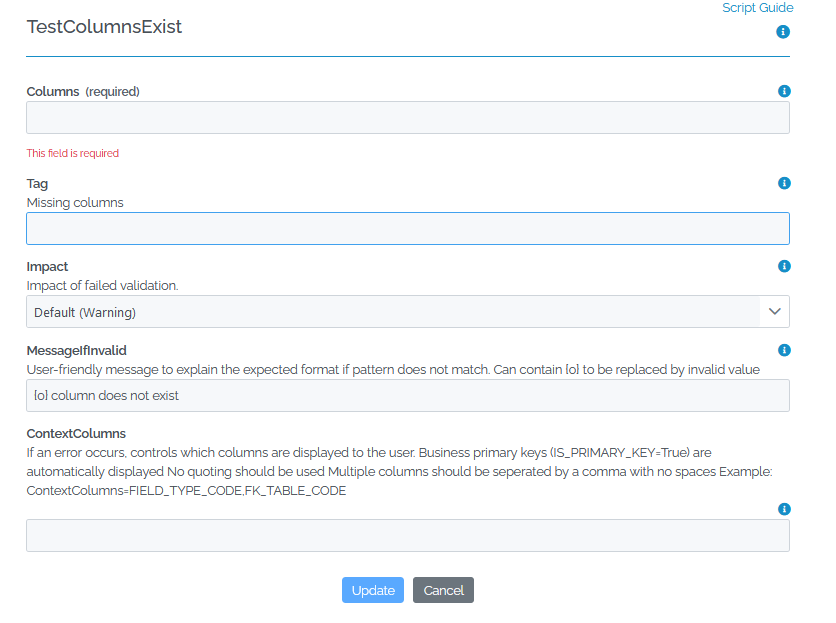
TestColumnsExist
TestColumnsExist verifies that a list of columns exists in the data being loaded.
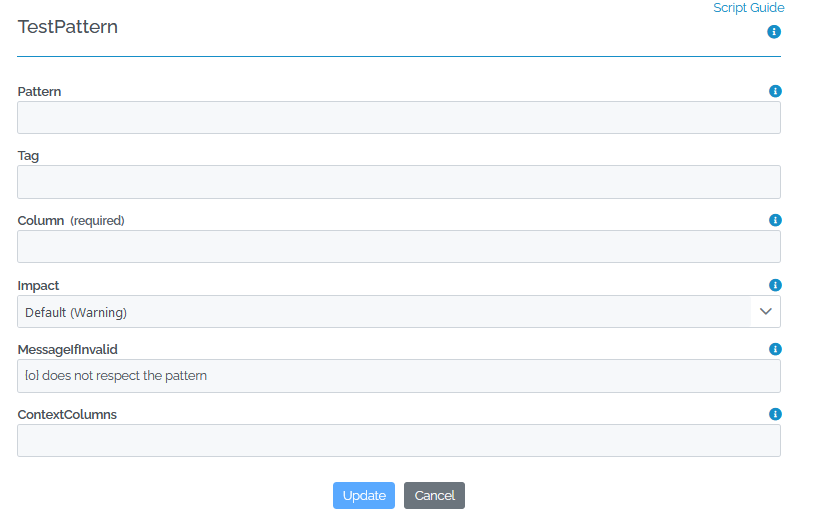
TestPattern
TestPattern verifies that a value matches a regular expression pattern. This is a powerful rule but requires knowledge of regular expressions. We recommend testing your regular expression in one of the many online regex testers before creating the rule.
Pattern: Regular expression pattern that is matched against each value in the selected columns.
Example
Setting a rule on a table
Here is an example of setting a Test Value in Range rule on a table column.
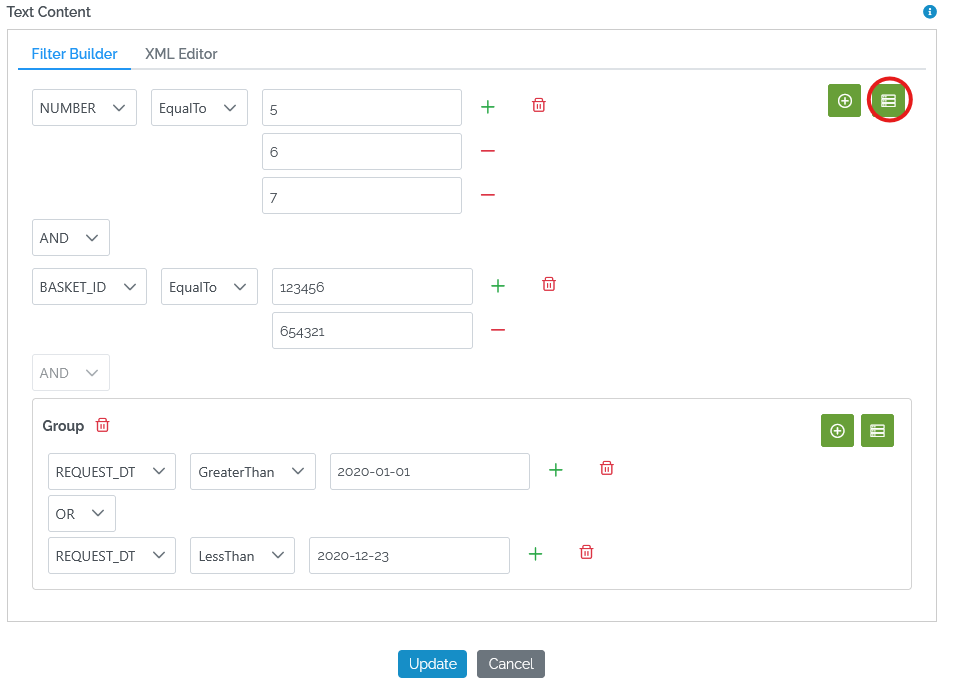
Once you have completed building the rules according to your needs, you may click on the “Show XML” button, to preview the code that is created.

Running/testing the rules
Use the Run button to run the rules against a portion or the entirety of a table, without having to create any batches. Next to the RUN button you may specify the number of rows for which the rule will be applied in order to check how it works.
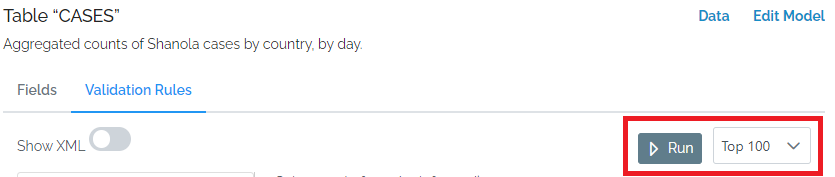
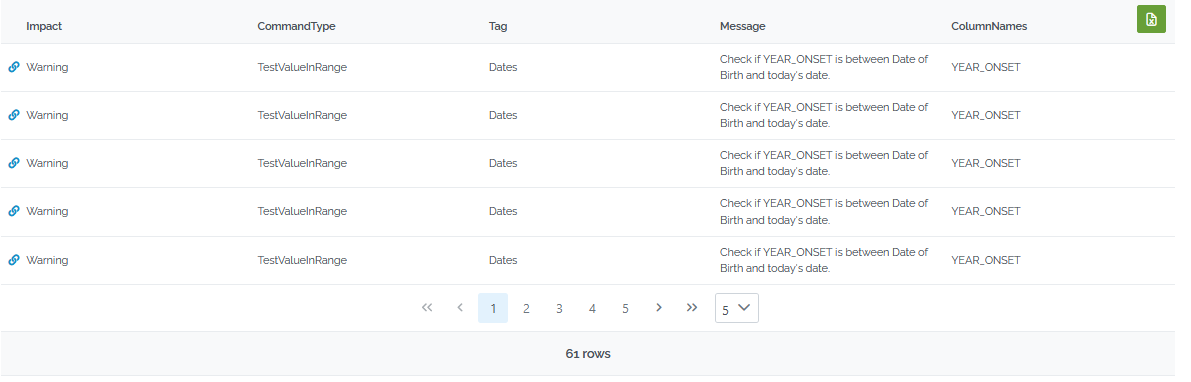
Below is the output of the above example. By clicking the green button on the right you have the option to download the results to excel.
Batch preview
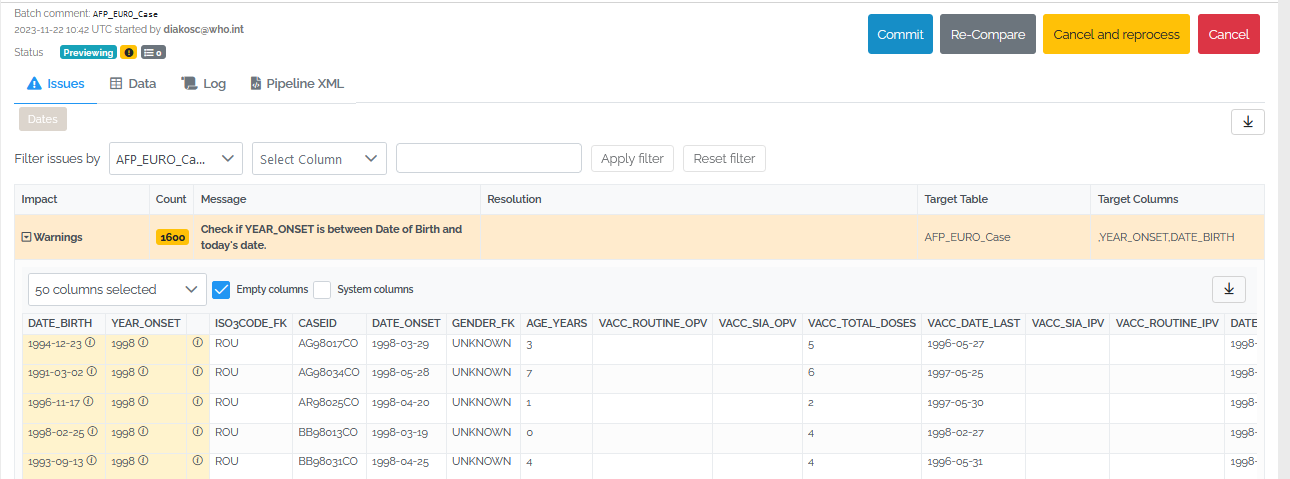
Let’s see also how the batch preview looks like from a data uploader’s perspective, after implementing a centralized rule. For this example we performed a standard upload, meaning, we uploaded a file directly to the table using the upload function on the data page. So there are no custom pipelines involved or any other custom validations.
Here is how the issues tab looks:
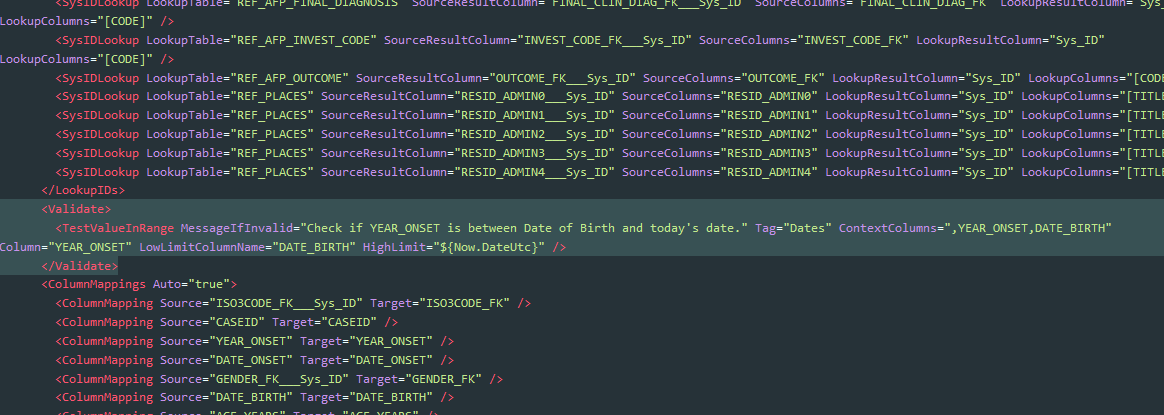
How it works - view pipeline xml
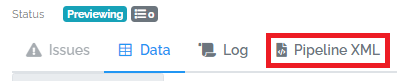
If you are curious, it works by embedding the centralized validation rules into whatever pipeline is running (there is always a pipeline involved, even for UI edits and data entry forms). You can see the final generated pipeline for any batch by clicking the Pipeline XML tab on the batch preview page.
Here is a small section of generated pipeline xml from the batch preview page, where our rule above is highlighted.